Flawless Fit: Essential Techniques for Installing Heavy-Duty Tool Mounting Plates
Importance of Proper Installation
Precision in tool mounting plate installation is not just about looks—it directly affects safety, load capacity, and how reliably your tools stay put under vibration and daily use. A plate that’s square, fully supported, and correctly fastened will carry its rated load; a plate that’s misaligned or under-secured can loosen, rattle, or fail when you need it most.
Start with the substrate. Your plate can only be as strong as what it’s attached to.
Vehicle bodies: Thin sheet metal needs rivet nuts or plus-nuts and, ideally, backing plates to spread load. Avoid self-tappers for heavy setups.
Wood walls: 3/4" plywood anchored to studs outperforms OSB. For direct-to-stud installs, use lag screws with adequate embedment.
Metal racks: Use through-bolts with locknuts and large-diameter washers to prevent pull-through.
Hardware selection is central to secure tool plate mounting. Use corrosion-resistant fasteners (zinc or stainless), appropriate grip-length rivet nuts, and locking methods that withstand vibration.
Use Nylock nuts or medium-strength threadlocker (blue) on all bolts.
Choose Grade 8 (imperial) or 10.9 (metric) where practical.
Deburr holes to prevent damaging the plate’s powder coat and to ensure flush seating.
Plan your tool storage plate setup before drilling. Low profile plate install work leaves little room for error, especially around latches and release mechanisms.
Dry-fit and verify clearance for cases, handles, and locking features.
Use 1:1 templates or DXF-driven CNC/laser accuracy to match hole patterns precisely.
Keep plates level to prevent tool cases from walking or binding.
Account for real-world loads. Vehicles and job sites introduce shock and dynamic forces that exceed static weight.
As a heavy duty mounting guide, assume 2–3x the static load to size fasteners and count. If a plate will carry 60 lb of tools, design for 120–180 lb in dynamic conditions.
Distribute fasteners evenly; don’t rely on the top corners alone.
Protect against corrosion and leaks. Powder-coated plates are durable, but penetrations are vulnerable.
Seal vehicle body holes with primer and seam sealer; add rust-inhibiting paint on exposed edges.
Isolate dissimilar metals (e.g., stainless fastener in aluminum) with washers to reduce galvanic corrosion.
Concrete examples:
Van door panel: Use eight 1/4-20 rivet nuts with a 0.7" grip range and a 1/8" aluminum backing plate inside the door skin. Add threadlocker and re-torque after the first 100 miles.
Shop wall: Mount into 3/4" plywood laminated to studs. Use 5/16" x 2-1/2" lags with washers at each corner and mid-span, totaling six to eight anchor points per plate.
Finish with an inspection routine. Check torque quarterly, look for powder coat chips to touch up, and retighten any hardware showing witness marks. Following these mounting plate best practices ensures the plate performs as designed and keeps your tools secure day after day.
Gathering Necessary Tools
Before you drill the first hole, assemble a kit that matches your surface, hardware, and load. The right prep speeds up tool mounting plate installation and prevents rework.
Layout and measuring
Tape measure or steel rule for accurate spans across rails or studs
Combination square and torpedo level to keep rows plumb and parallel
Center punch and scribe/paint marker for precise hole starts
Masking tape or low-tack layout film to mark on finished surfaces
Calipers to verify panel thickness and fastener grip range
1:1 template or printout: if you have BocoCustom DXF files, print at 100% scale to use as a drill template or to CNC-cut backing plates
Drilling and cutting
Cordless drill/driver; right-angle attachment for tight van bays
High-speed steel bits matched to fasteners; common sizes: 3/16", 1/4", 25/64", 11/32", 13/32", 9 mm (for M6 rivnuts)
Step bit for clean holes in thin sheet metal without grabbing
Deburring tool or countersink to remove sharp edges and ensure flush seating
Vacuum or magnetic sweep to collect chips and protect bearings and paint
Fastening and setting tools
Torque wrench or torque-limiting driver to avoid stripping inserts; follow hardware specs
Nutsert/rivnut setter (manual or pneumatic) sized for M5/M6/M8 or 10-24/1/4-20 inserts
Assorted clamps or Clecos to hold plates on layout lines during drilling
Impact driver (low setting) and hand wrenches/sockets for final snugging
Threadlocker (medium strength) for vibration resistance
Assorted hardware matched to the plate pattern and substrate:
- Through-bolts with fender washers and nylock nuts for plywood or composite cores
- Rivnuts/plus-nuts for thin van sheet metal (choose steel or aluminum to match panel)
- T-slot nuts for extruded racks and Unistrut
- Wood screws or Spax for 3/4" plywood when back access is not available
Surface prep and protection
Rust-inhibiting primer or zinc-rich cold galvanizing for drilled steel edges
Dielectric barrier (nylon washers or isolator tape) when mounting aluminum plates to steel to mitigate galvanic corrosion
Butyl tape or polyurethane sealant for exterior penetrations in trucks and trailers
Safety
Safety glasses, cut-resistant gloves, and hearing protection
Drop cloths and painter’s tape to protect interiors and paint
Project-specific examples
Van wall (0.8–1.0 mm steel): M6 rivnuts set with a calibrated tool, 9 mm hole via step bit, primer on raw edges, medium threadlocker, and backing washers where accessible for secure tool plate mounting.
Trailer plywood (3/4"): 1/4-20 through-bolts, large fender washers/backing plates behind the panel, torque to spec for a heavy duty mounting guide outcome.
Aluminum rack: M8 T-slot nuts with stainless bolts and anti-seize; verify slot size before the low profile plate install.
Before you start, unbox your BocoCustom plates, confirm hole patterns, verify powder-coat integrity, and stage all hardware. A complete setup reduces downtime and leads to a cleaner, safer tool storage plate setup and mounting plate best practices that last.
Illustration for Flawless Fit: Essential Techniques for Installing Heavy-Duty Tool Mounting Plates
Selecting the Ideal Mounting Surface
Before any tool mounting plate installation, choose a surface that can carry the static and dynamic load of your tools, plus the plate itself. Mobile applications (vans, trailers, service trucks) see higher shock and vibration than shop walls or carts, so prioritize rigidity and fastener access.
Start with structural integrity
Wood: Use 3/4" plywood or thicker, or anchor into wall studs. Avoid MDF. For shop walls, lag screws into studs are preferred over anchors in drywall.
Steel or aluminum: Through-bolt when possible. Thin sheet (≤1/8") benefits from a backing plate or rivnuts with large flanges. Avoid small self-tapping screws for dynamic loads.
Composite or plastic liners: Reinforce with a metal backer tied into structure.
Confirm flatness and footprint
Low profile plate install requires a flat mounting plane so the plate doesn’t rock and latch mechanisms align. Aim for flat within about 1/16" across the footprint.
Use shims or a backing plate to correct irregularities on corrugated van panels or trailer walls.
Verify clearances and orientation
Ensure latches, drawers, or Packout-style locks have unobstructed travel. Check door swings, handle clearance, and ceiling height.
Position to keep the center of gravity low and centered over support members. Avoid mounting heavy loads high on thin panels.
Plan your attachment method
Through-bolting: Use grade 5 or better 1/4-20 or M6 hardware with fender washers or a continuous backing plate. Nyloc nuts or medium-strength threadlocker resist vibration.
Rivnuts/threaded inserts: Match grip range to panel thickness; consider knurled or hex-body rivnuts in soft aluminum. Use large flange washers to spread load.
Wood: Use lag screws sized to at least 3/16" with pilot holes and large washers. For plywood, add a steel strip on the back to prevent pull-through.
Account for environment and corrosion
Stainless hardware is durable, but watch galvanic corrosion on aluminum substrates; isolate with nylon washers and apply anti-seize or dielectric barrier.
In wet or salty environments, seal penetrations with polyurethane sealant. Don’t sand through the plate’s powder coat; protect the finish with washers under bolt heads.
Protect wiring and structure
Scan or inspect behind surfaces for electrical, airbags, fuel lines, or insulation. In vehicles, favor OEM upfitter points or rails when available.
Load and spacing guidelines
Distribute fasteners near corners and along structural members. Maintain edge distance (generally ≥2x fastener diameter from panel edges).
For heavy-duty mounting guide purposes, design for dynamic loads 2–3x the static weight when mounted in vehicles or trailers.
Fabrication and customization
If you need custom reinforcement, brackets, or a backing plate, use precise bolt patterns from instant-download DXF files to ensure a flawless fit and secure tool plate mounting.
Final checks
Dry-fit the plate, mark holes, and pilot-drill. Deburr and protect raw edges. Torque fasteners evenly and recheck after the first week of use.
These mounting plate best practices streamline tool storage plate setup and help ensure a durable, low profile installation that stays secure on the job.
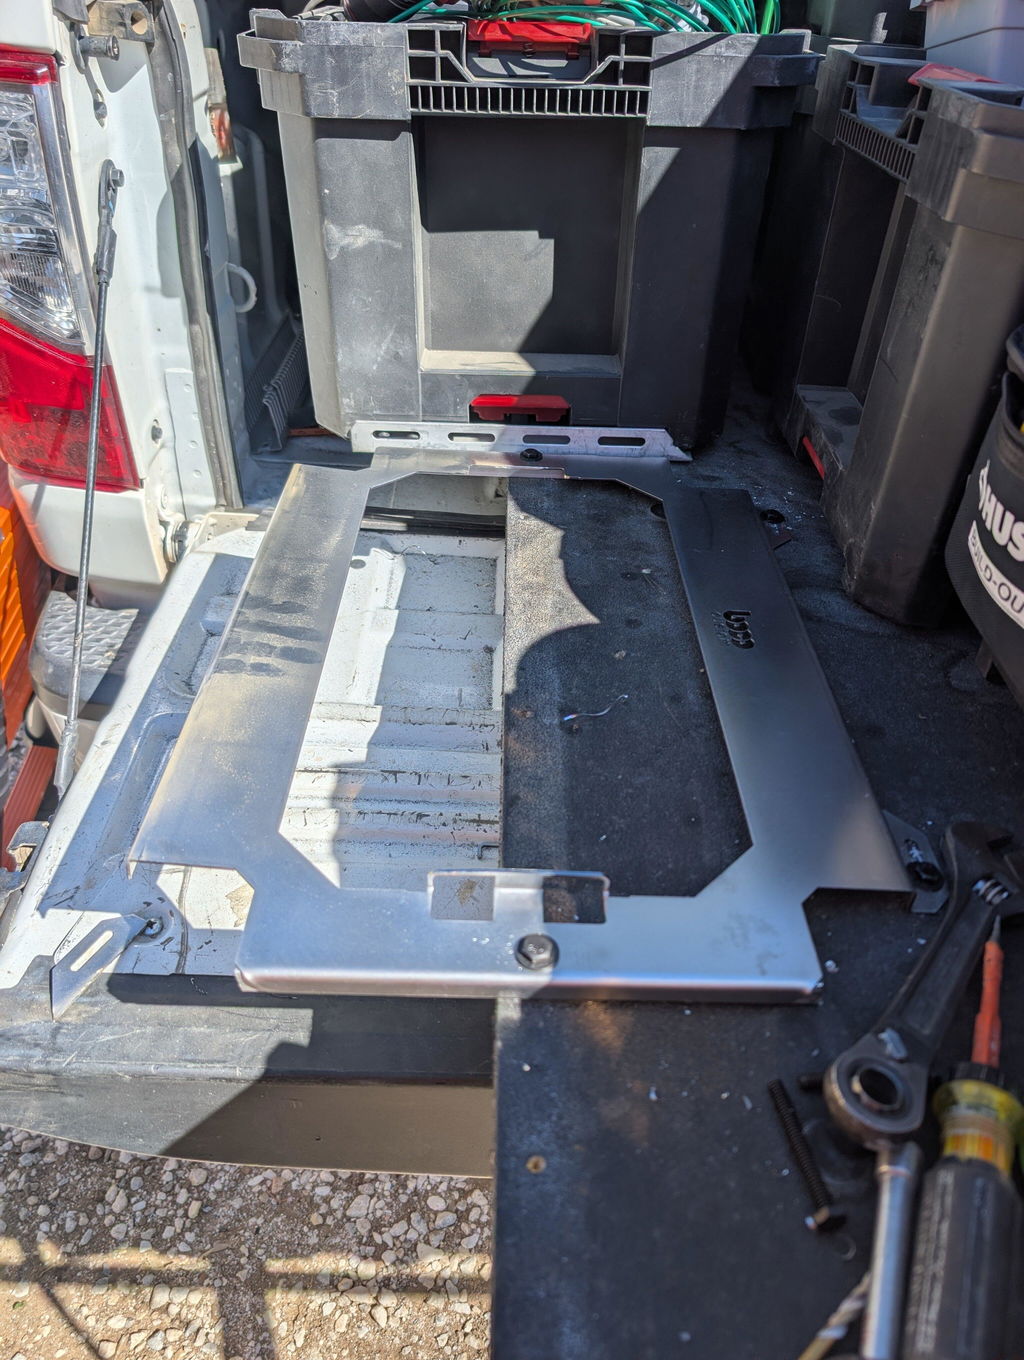
Preparing the Installation Area
A flawless tool mounting plate installation starts with site prep. Before a single hole is drilled, confirm the surface can safely accept the load, that your layout is accurate, and that you won’t compromise wiring, bodywork, or cabinetry. Solid preparation is the foundation of secure tool plate mounting and long-term reliability.
Plan the load path
Estimate the mass you’ll hang or transport and multiply for dynamic loads (vehicle vibration, off-road, door slams).
Choose structure, not skin: tie into studs, ribs, Unistrut, or reinforced panels rather than thin sheet or composite liners.
If only thin material is available, design a backing solution (steel/aluminum backing plates, plywood ledger) to spread the load.
Assess the substrate
Vehicle sheet metal: Favor through-bolting with large fender washers/backing plates. If using rivnuts, verify grip range and material (steel or stainless) and avoid single-layer installs for heavy loads.
Plywood or framed walls: Use 3/4 in plywood or add a ledger fastened to studs. Pre-plan screw spacing to avoid splitting.
Aluminum bodies/racks: Isolate dissimilar metals to prevent galvanic corrosion; use nylon washers, gasketing tape, or paint between surfaces.
Tool carts/chests: Confirm lid/skin thickness and internal reinforcement. Avoid mounting across flexing panels.
Verify clearances and ergonomics
Check door swings, drawer travel, seat movement, and window/vent paths.
For low profile plate install objectives, confirm the plate and mounted tools don’t interfere with cargo, tie-downs, or safety equipment.
Maintain access to service panels, fuses, and shutoffs.
Locate safe fastening zones
In vans/trailers, identify ribs and structural members; use a stud finder/metal detector and borescope to map hidden wiring, airbags, and fuel/brake lines.
Mark a level reference line and centerline. Use painter’s tape to create a writeable, scratch-free layout surface.
Surface preparation
Clear the area; protect nearby finishes with blankets or cardboard.
Degrease with isopropyl alcohol or a solvent-grade degreaser. Remove rust/scale; prime any bare metal you expose.
If bonding or using foam gaskets, lightly scuff glossy paint for adhesion.
Layout and templating
Dry-fit the plate. Use it as a drill template or print a 1:1 template from Boco Custom’s DXF files for precise hole placement.
Mark hole centers with a punch to prevent bit wander—essential mounting plate best practices for accuracy.
Hardware staging
Illustration for Flawless Fit: Essential Techniques for Installing Heavy-Duty Tool Mounting Plates
Select fasteners now: bolt grade, length, washers, and lock nuts. Have threadlocker and anti-vibration washers on hand for secure tool plate mounting.
Pre-cut backing plates from steel or aluminum using DXF patterns for a clean tool storage plate setup.
Pilot tests and edge treatment
Drill pilot holes in non-critical areas to validate bit size and grip. Deburr all edges.
Seal drilled holes in vehicle bodies with primer/seam sealer to prevent corrosion.
Environmental checks
Ensure adequate lighting and stable temperature; adhesives, sealers, and coatings cure best above 50°F/10°C.
Wear PPE and manage filings to protect interiors and finishes.
A disciplined prep routine like this heavy duty mounting guide reduces rework and ensures a clean, precise installation. With the site ready and hardware staged, you’re set up for a strong, professional fit.
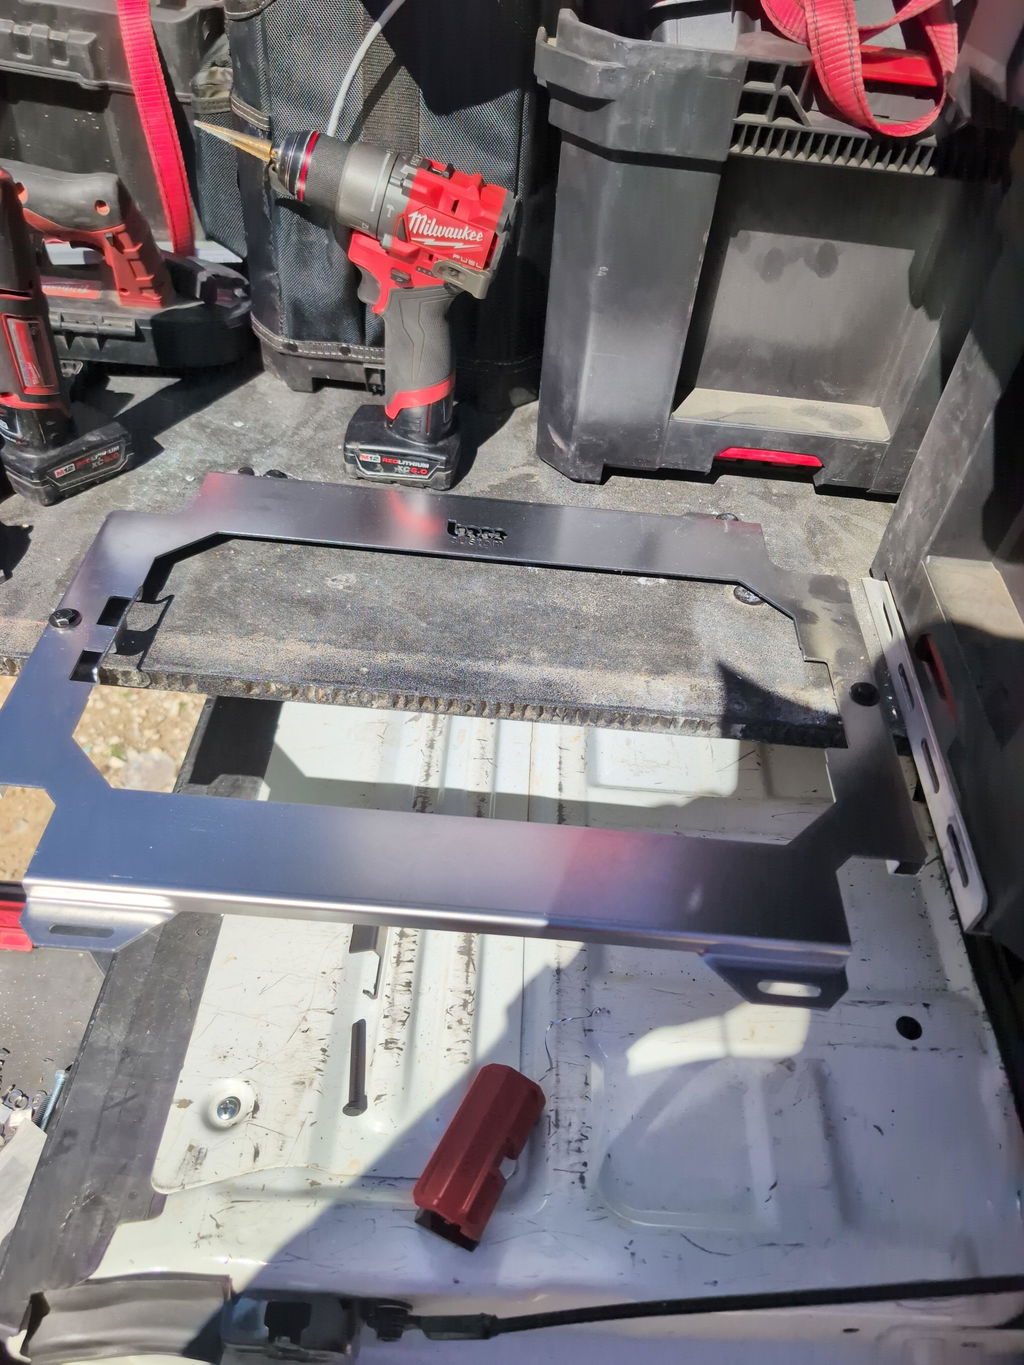
Accurate Drilling and Fastener Choice
Precise hole placement is the foundation of a reliable tool mounting plate installation. Start with layout. Use the plate as a drill template or print the 1:1 DXF to transfer hole centers with a transfer punch. Mask the surface with painter’s tape, scribe your lines, and clamp the plate or paper template to prevent creep. Confirm clearance behind the panel with a mirror or borescope before drilling to avoid wiring, airbags, fuel lines, or HVAC ducts.
Choose bits for the substrate. In steel, use cobalt HSS at low RPM with cutting oil. In aluminum, keep RPM moderate and use lubricant to prevent chip welding. For thin sheet, a step bit produces round, burr-free holes; for plywood, use brad-point bits for clean entry. Pilot drilling improves accuracy—start 1/8 in and step up. Deburr both sides so the plate sits flat and the low profile plate install remains flush.
Match fasteners to material and load:
Plywood/Composite panels: Through-bolt with 1/4-20 or M6 hardware and large fender washers or a backing plate. T-nuts from the back face also work for repeat removal. Avoid relying on coarse wood screws for heavy tools.
Vehicle sheet metal: Use rivnuts/plusnuts sized per the insert spec (commonly 3/8 in drill for 1/4-20; 9 mm for M6) or through-bolt where accessible. Seal raw edges with primer and use sealing washers to prevent moisture ingress. Choose steel or stainless inserts for strength; aluminum inserts are easier to set but lower in pull-out.
Unistrut/T-slot extrusions: Use proper channel/T-nuts with serrated flange bolts for secure tool plate mounting. Verify nut spring engagement and slot size.
Aluminum frames: Consider steel rivnuts with isolating washers or anti-corrosion paste to reduce galvanic corrosion between stainless hardware and aluminum.
Select hardware grades that match the duty. Common choices: Grade 8 (SAE), 10.9 (metric), or 18-8/A2 stainless. Use nylon-insert lock nuts, serrated flange nuts, or medium-strength threadlocker (Loctite 242/243) for vibration resistance. If using stainless-on-stainless, apply anti-seize to prevent galling. Follow a torque chart for your bolt size and grade—over-torquing can crush substrates; under-torquing invites loosening.
Keep the profile low and snag-free. Where the plate design includes countersunk holes, use flat-head screws so hardware sits flush. Elsewhere, button-head or low-profile socket heads minimize projection. Add washers to protect powder-coated finishes; avoid overly hard washers directly against coatings to prevent chipping.
Distribute load. A backing plate or large washers on thin panels dramatically increases pull-through resistance—critical for a heavy duty mounting guide in vans and service bodies. Respect dynamic loads: bouncing, cornering, and panic stops impose higher forces than static weight.
Before final tightening, dry-fit the plate and attached system to confirm alignment. Tighten hardware in a cross pattern, recheck torque after the first week of driving, and inspect fasteners at regular service intervals. For repeatable tool storage plate setup, document hole locations and hardware sizes—or use Boco Custom’s DXF files to standardize future installs across vehicles and benches.
Securing the Mounting Plate
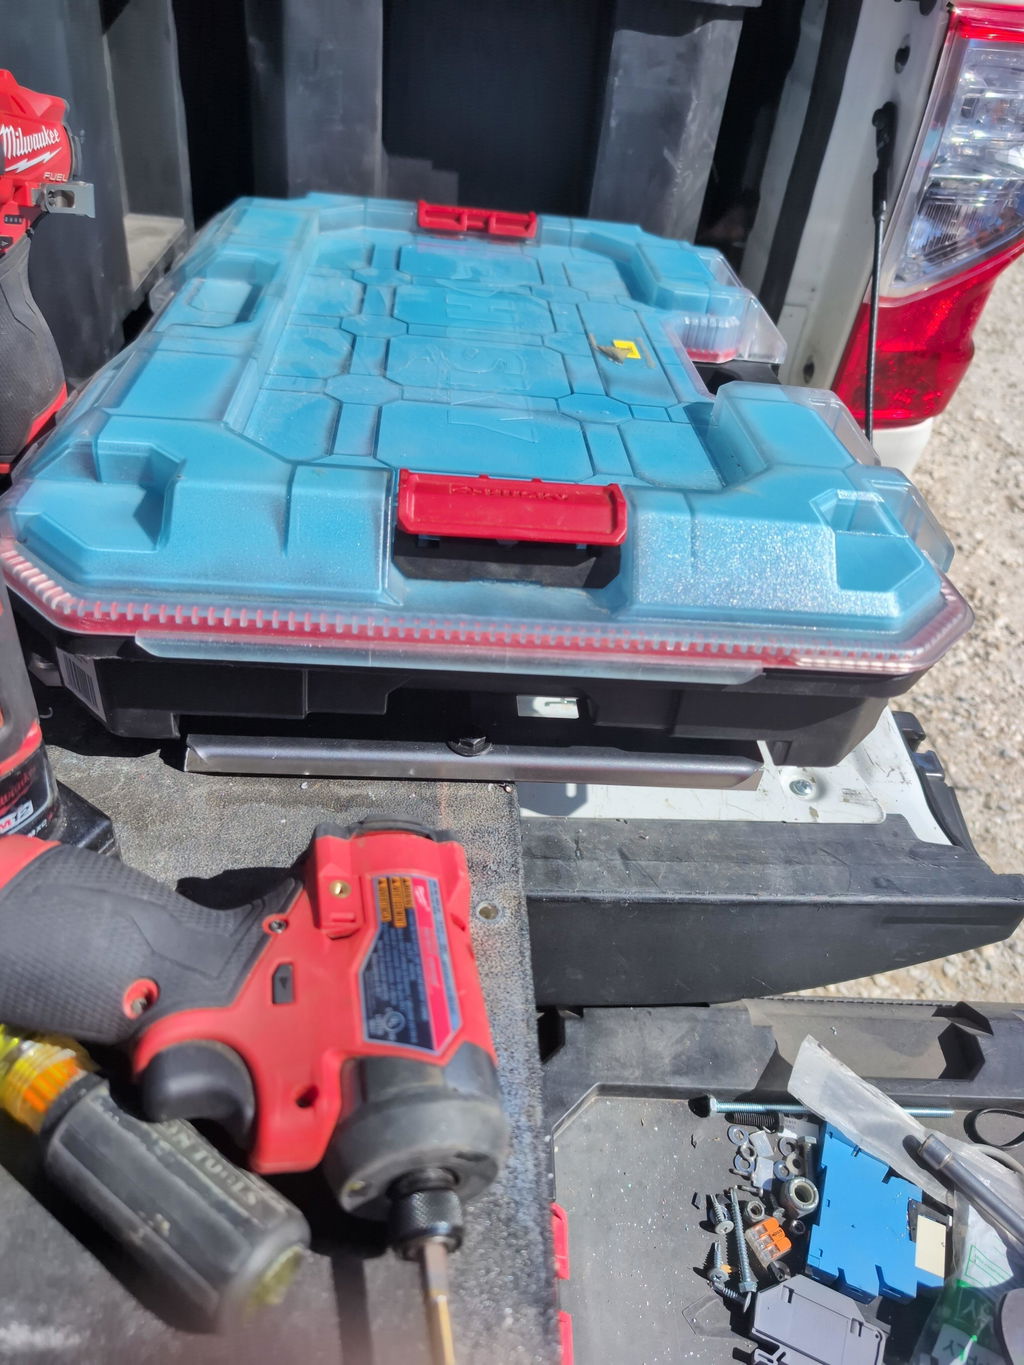
A secure tool plate mounting starts with the substrate. Confirm the surface is flat, structurally sound, and thick enough to hold threads or anchors. Map the load path: assume fully loaded boxes or racks will see dynamic forces during transport. For a low profile plate install, use every mounting hole provided; skipping holes concentrates stress and invites vibration.
Align the plate before drilling. Establish centerlines and square the plate to edges or existing rails so your tool storage plate setup doesn’t skew downstream accessories. Masking tape makes clean, visible marks on powder coat. Clamp the plate so it can’t creep as you drill.
Drill and prep holes to the correct diameter for your fasteners. In metal, start with a pilot and step up; deburr both sides to keep the plate flush. In wood, use a brad-point bit for clean entry. Treat raw steel with primer to prevent corrosion, and seal holes in exterior applications to block moisture.
Choose hardware based on the material you’re mounting to:
Thin sheet metal (van floors, service bodies): Install steel knurled rivnuts (M6 or M8) matched to panel thickness. A proper crush is critical; practice on scrap to verify grip. Backing plates can boost pull-out resistance near edges.
Thick steel or aluminum: Through-bolt with Grade 8 / Class 10.9 or Grade 5 / Class 8.8 bolts with fender washers and nyloc nuts. Where access is limited, use plus-nuts for higher grip range.
Wood/composite decks: Use lag screws or through-bolts with large fender washers on both sides. Add a sealed backer board under thin plywood to spread loads.
Concrete shop floors/walls: Use stainless or zinc wedge/sleeve anchors sized to the plate’s hole pattern; vacuum dust and blow out holes before setting.
Mind galvanic corrosion. Isolate dissimilar metals (e.g., stainless fasteners in aluminum) with nylon washers or barrier tape, and use anti-seize to prevent galling. On exterior installs, apply a bead of polyurethane or butyl sealant around holes; avoid trapping water under the plate.
Fasten progressively and evenly. Bring all bolts snug, verify the plate sits flat, then torque to spec—tight enough to prevent movement without bowing the plate or crushing the substrate. Use blue threadlocker or nyloc nuts for vibration resistance. If ribs or uneven surfaces create gaps, use machined spacers so the plate remains fully supported.
Before loading tools, perform a pull-and-shake test. If there’s any movement, recheck torque, spacers, or anchor choice. After the first week of use, re-torque fasteners; thermal cycles and vibration can relax joints.
For tool mounting plate installation that fits flawlessly—especially with heavy-duty, powder-coated plates—these mounting plate best practices reduce rattle, protect finishes, and ensure long-term reliability.
Verifying Plate Stability
After any tool mounting plate installation, confirm that the system is stable under both static and dynamic loads. Vibration, cornering, and emergency stops can multiply forces well beyond the plate’s static rating, so verification is essential for secure tool plate mounting in vehicles, shop carts, and trailers.
Illustration for Flawless Fit: Essential Techniques for Installing Heavy-Duty Tool Mounting Plates
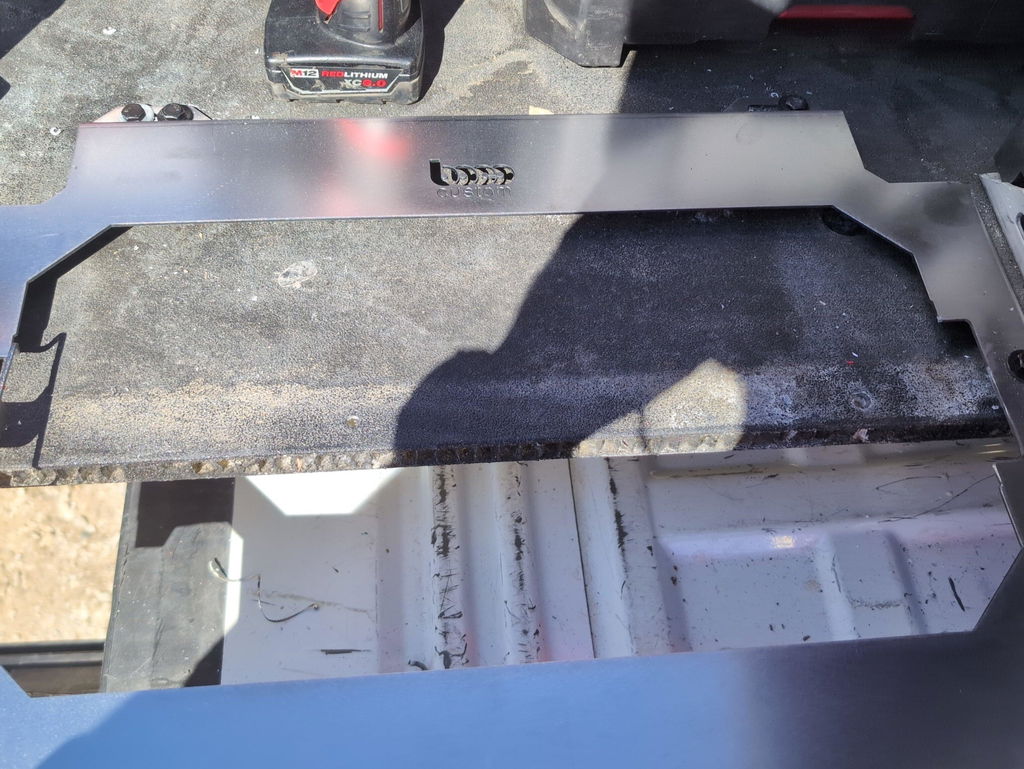
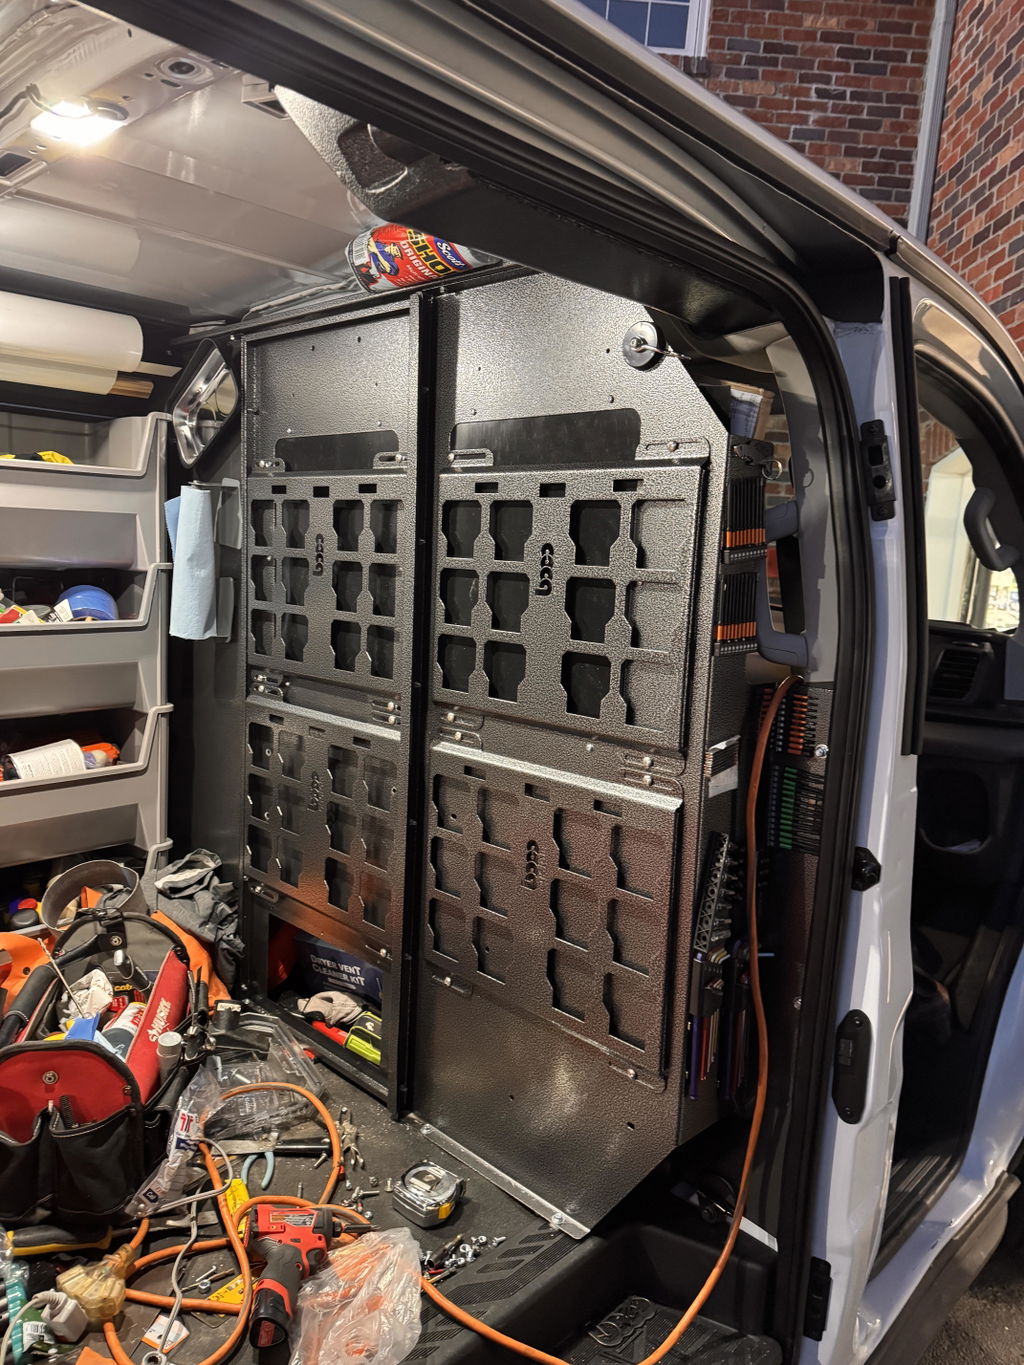
Start with the substrate. Plates anchored to 12–16 ga steel, aluminum structure, or 3/4 in cabinet-grade plywood resist fastener pull-through better than thin sheet or OSB. If you’re tying into a van floor or wall, locate ribs or factory hard points instead of unsupported skin. Use rivnuts with the correct grip range on thin metals; use through-bolts with fender washers or backing plates on wood and composites.
Confirm fasteners and torque. Choose hardware that matches the plate and environment: zinc-plated or stainless bolts, Nyloc nuts or medium-strength threadlocker. Follow the hardware’s torque spec, not “feel.” Once tightened, add paint-pen witness marks across nut and substrate to spot loosening at a glance.
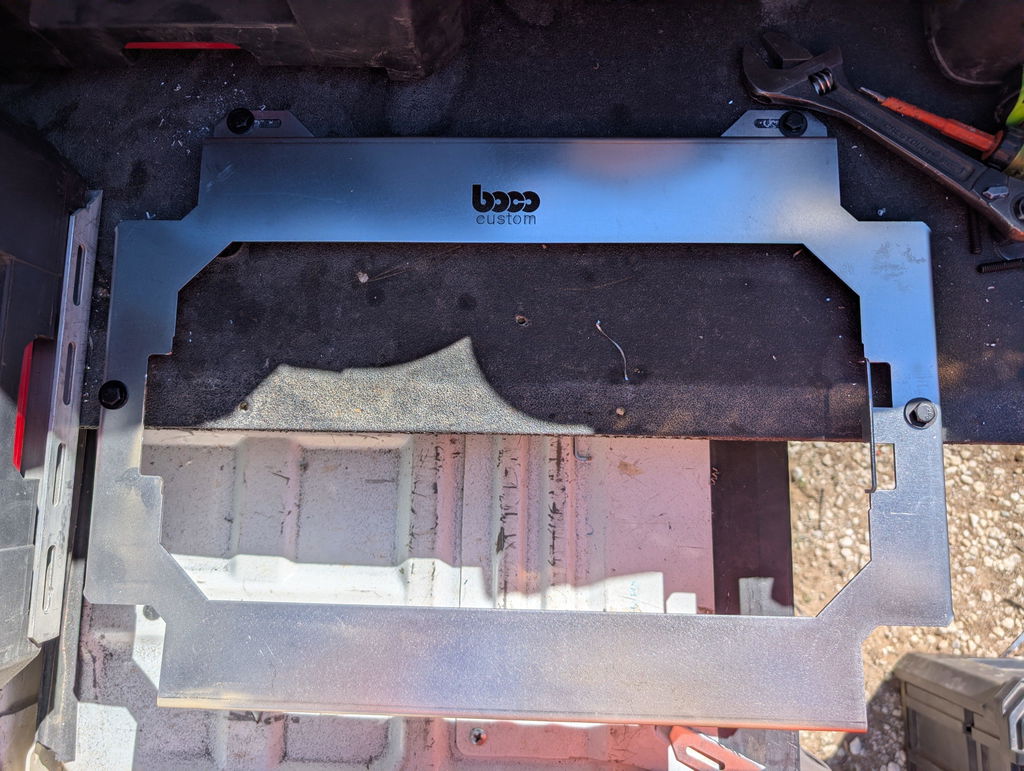
Check flatness and contact. A low profile plate install should sit flush without rocking. Use a straightedge and feeler gauge; gaps larger than a business card indicate high spots or debris. Ensure fastener heads or rivnut collars don’t prop the plate off the surface. On powder-coated plates like Boco Custom’s, clear any coating buildup in countersinks and slots so hardware seats fully.
Stage-load the system. Add weight in increments—25%, 50%, then 100% of expected load—while monitoring:
Deflection: measure at corners and mid-span. Visible flex suggests undersized substrate or insufficient fastener spacing.
Movement: try to twist and slide the plate by hand. Any creep means holes are oversized or hardware isn’t clamping properly.
Noise: rattles point to contact points or loose accessories.
Simulate real use. For a van tool storage plate setup, drive over speed bumps and rough roads with the bin locked in. For shop carts, push, stop abruptly, and pivot quickly. Recheck witness marks and re-torque after the first day and again after a week; threadlocker needs a full cure cycle.
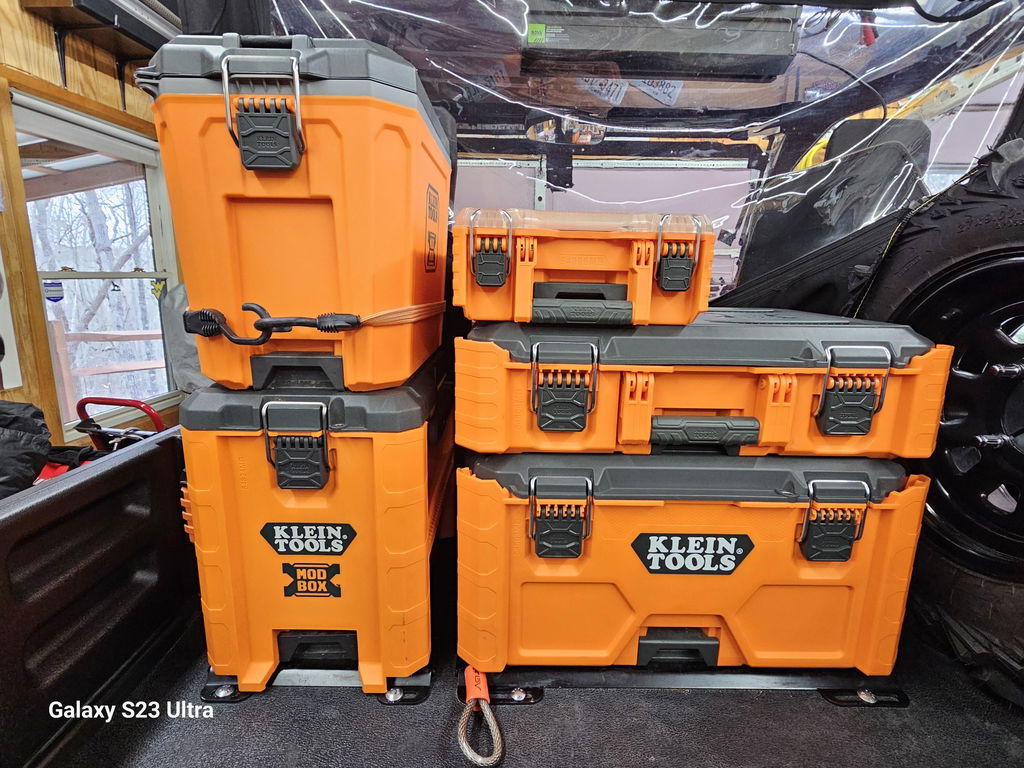
Verify accessory retention. With a Milwaukee Packout stack or similar locked to a Boco Custom plate, lift one corner of the load and attempt to shear the latch sideways. There should be no lift-off, unlatching, or rail deformation. If latches disengage under side load, adjust latch tension or add a secondary tether for redundancy.
For fabricators using DXF files, measure critical hole spacing before finishing. Deburr, keep heat input low to avoid warping, and account for coating thickness so slots remain within tolerance.
Final checklist for mounting plate best practices:
Correct substrate and reinforcement in load paths
Proper hardware, torque, and thread retention
Full-contact, wobble-free seating
Staged load and dynamic tests passed
Accessory locks verified under side load
Re-torque schedule set and documented
These steps form a practical heavy duty mounting guide that keeps your setup reliable and safe long-term.
Maintenance for Longevity
Long service life starts right after tool mounting plate installation. Set a maintenance cadence and stick to it so hardware stays tight, finishes stay intact, and latching interfaces continue to engage cleanly under real-world vibration and load.
Adopt a simple inspection schedule:
After first week (or 250–500 miles of road time): Re-check all fasteners. Mark bolts with torque paint so any rotation is obvious at a glance.
Monthly (or 1,000 miles): Inspect fasteners, backing plates, and substrate. Verify nothing has shifted and that the plate still sits flush for a low profile plate install.
Quarterly: Remove mounted modules and vacuum debris from keyholes, slots, and latch rails. Inspect for hairline cracks, elongating holes, or coating damage.
After any impact, emergency stop, or reconfiguration: Perform a full re-torque and visual inspection.
Keep fasteners honest. For secure tool plate mounting, use either nylon-insert lock nuts or medium-strength threadlocker; choose one method per joint. If you used stainless hardware, apply anti-seize to prevent galling. Where steel plates meet aluminum beds or racks, add isolating washers or a thin non-conductive membrane to reduce galvanic corrosion—especially in coastal or winter-salt environments.
Mind the finish. Powder-coated plates resist abrasion, but chips can start corrosion in harsh service. Clean with pH-neutral soap and water; avoid aggressive solvents. Touch up nicks promptly with a rust-inhibiting primer and matching enamel. In enclosed trailers and vans, periodically wipe condensation-prone areas and re-seal penetrations with automotive seam sealer to keep moisture out of cavities.
Protect the interfaces that do the work. Latching cleats and capture edges should be free of grit and metal chips; blow them out with compressed air and use a dry PTFE spray if needed. Oils and greases attract debris and can increase wear. On wall or rack setups, confirm that modules engage fully without slop; any new play is a sign to inspect hardware and hole geometry.
Validate your load strategy. Distribute weight so the heaviest cases sit low and closest to structure. Do not exceed the plate’s or substrate’s rated capacity. On service trucks, add rubber isolators between plate and bed to damp vibration; re-check isolator compression over time. In shop walls, ensure anchors still bite firmly in studs or masonry and that no fastener has started to pull through.
If you fabricated from DXF files, deburr edges, verify hole sizes and spacing before final assembly, and finish with powder coat or a durable paint. Re-check that your chosen fastener grade matches the design intent, and keep a torque chart on hand for mounting plate best practices.
Document each check in your tool storage plate setup log. A few minutes of routine care preserves a flawless fit and performance the next time you lean on this heavy duty mounting guide to reconfigure your system.
Standard shipping takes 5 to 7 business days. Express (2 to 3 days) and overnight options are available at checkout. Orders over $50 ship free.
Can I order online and pick up in store?
Yes. Select "Pick up in store" at checkout and choose your nearest location. Most orders are ready within 2 hours.
What if my order arrives damaged?
Contact us within 7 days of delivery with your order number and a photo. We'll arrange a replacement or refund, no return shipping required.
AI-Generated Content Disclosure
This blog post was created with the assistance of RankGPT, an AI-powered tool designed to generate high-quality, SEO-optimized content at scale.
As a small business embracing modern technology, we use AI to help us:
Produce informative articles more efficiently
Increase our online visibility through better performance in traditional search engines (like Google) as well as emerging AI-powered searches and answer engines
Reach more potential customers and grow our presence in a competitive digital landscape
By leveraging tools like RankGPT, we're able to publish valuable content more consistently and scale our efforts in ways that would otherwise take significantly more time and resources.
Important notes for readers:
While RankGPT helps create well-structured and relevant content based on current best practices, AI-generated posts are not always 100% accurate, complete, or free from errors.
The information, opinions, and perspectives expressed may not fully reflect the exact views, experiences, or official positions of Boco Custom, its team members, or the individuals involved in our business.
AI content should be viewed as a starting point or general resource—not as personalized professional advice, definitive facts, or a substitute for direct consultation with us or qualified experts.
We always recommend verifying important details independently, especially for decisions related to custom products, services, or any business matters.
We are committed to transparency and continually work to improve our content. If you have questions, feedback, or spot any inaccuracies, please reach out—we genuinely appreciate it!
Not only is this way overbuilt for the price with its solid, confident craftsmanship, I am completely convinced that these guys are the best around when it comes to the packout platform.
I like these, they are much more compact than what Milwaukee offers. I had them powder coated in silver vain and they look awesome. I love the bonus half rack they sent me. That’s the mark of a nice company.


Dejar un comentario